Showing posts with label recycled. Show all posts

Friday, March 15, 2013

Recycled "Flower" Water Bottles


I've seen some gorgeous photos of garlands made from transformed water bottles online and decided to try it with a group of children. It's best to use the lightest weight bottles that you can find so that they are easier to cut. I used scissors to cut off the bottom couple of inches. I cut the sides into strips to mimic flower petals. We tried painting some of the flowers with acrylic paint, but it prevented the light from shining through. Most of the bottles pictured are decorated with permanent markers. I had read that bottles could be joined together with a glue gun, but I was not successful in making them stick together. At first I couldn't figure out how to string them with straws between the flowers so that they stayed separated. I came up with the idea of stringing circles of heavy paper in between the straws and the bottle caps. You can see this in the photos.


If you can find a place to hang them with a good light source they cast beautiful reflections.


Green Crafts Showcase

Friday, November 30, 2012

Making your own Printing Stamps

To make these little stamps I took some of the textures that I used in my post about rubbings and glued them to scraps of wood. They're a nice comfortable size for a child's hand.


1. Rippled paper from a gift box


2. The material that onion bags are made from


3. Rolls of liners for drawers


4. cloth doily


5. plastic doily


6. strip of plastic from packaging


7. I honestly don't know what this is. I picked it up in the sewing section of a craft store. Maybe someone can tell me. Anyway, it's plastic.


Printing ink was rolled onto the surfaces with a brayer. This would probably be another good way to make wrapping paper.
Check out my giveaway here.

Friday, August 10, 2012

Recycled Bulletin Board

I wanted a bulletin board to hang up next to my drafting table so that I could have easy access to some inspiration. I pulled this old wooden picture frame out of our attic and lightly spray painted it so that touches of the wood would show through giving it a distressed look. I covered particle board with burlap that I picked up at Walmart for less than three bucks. It's all ready to be hung!

Monday, May 21, 2012

Make a Table

My husband, John, and I made this this table from materials that we had lying around the attic and basement. I was looking for a type of pedestal to display some sculptures for an exhibit of children's art work and we came up with this table idea. John cut the base and top of the table from scraps of plywood using a bandsaw. The pedestal is the tubing that rugs are wrapped around and are frequently available, free for the asking, from a carpeting store. They are extremely sturdy, about eight feet long and require a small hand saw to cut them to the desired length. I had planned on using a hot glue gun to adhere the top and base to the pedestal, but John came up with the idea of cutting wood circles that would attach to the base and top and "plug" into the hollow tubing. My little drawing illustrates the concept. After assembling I collaged items from the newspaper, pages from our son's math notebook and whatever tickled my fancy to the surface using Mod Podge. As you can see, I've put it to use holding some of my art supplies and it's convenient that it is the same height as my drafting table. (It worked well for the show, too.)

Wednesday, May 9, 2012

Paper Map Beads

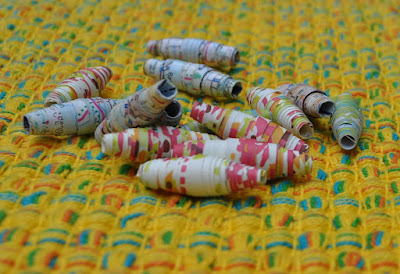
Bead making is a fun activity for a rainy day. I wouldn't recommend this project for children younger than eight years of age and it does take a little practice to get the hang of it. Some of the pictured beads were made using a page from an old atlas and others from scrap booking paper. For both types I cut very elongated triangles that are one inch wide at the base. I then coated the back of the paper with a glue stick. To roll up the beads I made a little tool from a Bic pen that no longer had any ink. I took the pen apart to get to the tubing that formerly held the ink and cut a slit with a razor blade into the plastic. The slit holds the paper triangles in place so that you can twirl them around the tubing making the bead. I would suggest cutting an extra little notch at the end of the slit to make it easier to inset the paper. If the paper in your atlas is flimsy it can be a little difficult to inset into the tubing. Scrap booking paper is a nice weight to get started with. Also, you may need to apply a little extra glue stick at the end to ensure a good hold.


I'm starting a newsletter with DIY templates, news from my Etsy shop, and step-by-step photos of some of the techniques for my artwork and illustrations. The newsletter in early June 2018 will include a template for a simple pop-up book to make with children. Sign-ups on the right-hand side of the blog.

Tuesday, October 25, 2011

Collage Flowers on Canvas


This is a fun project to use up scraps of paper or fabric. For this collage I started with a pre-stretched canvas square. I painted in the sky blue background with acrylic paint. Remember to paint the sides of the canvas to give it a finished look. I collected a variety of printed materials that I found appealing including pages from an atlas, scrap booking paper, and pages from the newspaper. I used a glue stick to assemble the flowers on sheets of white paper. I made copies of the flowers using my printer and then glued the copies with white glue to the canvas. There's no reason that you couldn't glue your original flowers directly on the canvas. I covered the entire surface with Mod Podge and to add some dimension I glued the buttons on top. Burlap, felt and even sheet music are other fun ideas to add interest to the piece.

Tuesday, April 19, 2011

Monoprint Greeting Cards


After making a stack of monoprints (previous post) I decided that there were many that had not turned out exactly as planned, but they had some nice elements that might be recycled. I cut the prints into squares and the squares into triangles, mixed and matched different color schemes and mounted them with glue stick on blank greeting cards. I'm glad I did not just toss them out.