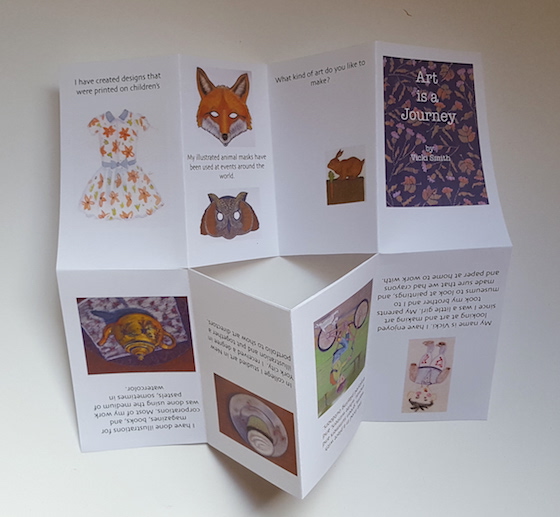
Monday, May 21, 2012
Make a Table
My husband, John, and I made this this table from materials that we had lying around the attic and basement. I was looking for a type of pedestal to display some sculptures for an exhibit of children's art work and we came up with this table idea. John cut the base and top of the table from scraps of plywood using a bandsaw. The pedestal is the tubing that rugs are wrapped around and are frequently available, free for the asking, from a carpeting store. They are extremely sturdy, about eight feet long and require a small hand saw to cut them to the desired length. I had planned on using a hot glue gun to adhere the top and base to the pedestal, but John came up with the idea of cutting wood circles that would attach to the base and top and "plug" into the hollow tubing. My little drawing illustrates the concept. After assembling I collaged items from the newspaper, pages from our son's math notebook and whatever tickled my fancy to the surface using Mod Podge. As you can see, I've put it to use holding some of my art supplies and it's convenient that it is the same height as my drafting table. (It worked well for the show, too.)
Thursday, May 17, 2012
Paper Lanterns
Paper lanterns are simple to make and brighten up the backyard for any occasion. I used a Sharpie to create the pictured design on a legal size sheet of paper. The beauty of this was that I was able to make copies onto card stock so that I wound up with a whole string of lanterns and only had to make one design. I've made these many times with children using construction paper and crayons. I encourage them to decorate both sides of the paper so that they are especially colorful. Virtually any type of paper can be used and it is not necessary to start with your own design.
Wednesday, May 9, 2012
Paper Map Beads
Bead making is a fun activity for a rainy day. I wouldn't recommend this project for children younger than eight years of age and it does take a little practice to get the hang of it. Some of the pictured beads were made using a page from an old atlas and others from scrap booking paper. For both types I cut very elongated triangles that are one inch wide at the base. I then coated the back of the paper with a glue stick. To roll up the beads I made a little tool from a Bic pen that no longer had any ink. I took the pen apart to get to the tubing that formerly held the ink and cut a slit with a razor blade into the plastic. The slit holds the paper triangles in place so that you can twirl them around the tubing making the bead. I would suggest cutting an extra little notch at the end of the slit to make it easier to inset the paper. If the paper in your atlas is flimsy it can be a little difficult to inset into the tubing. Scrap booking paper is a nice weight to get started with. Also, you may need to apply a little extra glue stick at the end to ensure a good hold.


Sunday, April 15, 2012
Salt Dough Medallions
Making medallions from homemade salt dough is a great tactile experience for children and adults with some very pretty results.
Here is the recipe that I used:
1 cup flour,
1 tablespoon salad oil,
1 cup water,
1/2 cup salt,
2 teaspoons cream of tartar,
food coloring.
Combine all ingredients, other than the food coloring, in a saucepan. Stir constantly while heating at medium. The mixture will be soupy for a few minutes until it begins to thicken and pull away from the sides of the pan. At this point, remove from heat and continue to stir. When a ball begins to form, turn the mixture onto a floured board. Knead until any lumps are gone and add extra flour if the dough is too sticky. It can be used immediately or stored in the refrigerator.
I used about 2 tablespoon of dough and mixed in a couple drops of food coloring before rolling out the dough with a rolling pin. I cut out the circles with a plastic glass and used the "tools" in the picture to make impressions in the clay. The salt dough can be air dried for several days or baked at 170 degrees for a couple of hours depending on thickness. The dough does expand slightly when baked so make sure that your impressions are deep enough so that they don't disappear and that the hole you make for hanging them is a little larger than you might think you will need. After baking I coated mine with glossy Mod Podge.
Tuesday, April 10, 2012
Tulle Flowers
Tulle comes in such beautiful colors and is quite inexpensive and forgiving to work with. The school where I teach wanted a backdrop for their spring play about gardens. I had at least 20 yards of a shiny, white fabric and decided that making flowers with tulle and attaching them to the fabric would create dimension and be an unusual way to solve the problem. The children applied blue watercolor in plastic spray bottles to the fabric. I picked up tulle in half a dozen colors at my local Ace Hardware, of all places, for just $1.19 a yard. I cut the tulle into long skinny rectangles and pinched them together in the center for the petals. When I had five or six done I would tack them to the fabric with thread and needle. I cut out small circles in contrasting colors and bunched those together for the centers. The finished piece is about eight feet long and I was unable to get a good photograph to capture it in its entirety. You can get an idea of the scale by comparing the size of the flowers to the spool of thread and sewing scissors. I think they would be adorable in a little girl's room.
Wednesday, March 28, 2012
Tuesday, March 20, 2012
Oodles of Doodles Easter Basket
This is a fun little springtime project to make with your child or for your child. I started with a square of board that is used to mount photos, but poster board would work just as well. I divided my square into nine small squares and used markers to doodle the flower pattern. I flipped it over and drew in the yellow stripes, cut out another piece for the handle and also decorated that piece. I cut along the green lines that are indicated in my diagram below and used a bone folder to score along the dashed line. Holes were punched in the small blue circles so that paper fasteners or brads can join the sides and the handle. I used a little white glue to secure the sides.
Subscribe to:
Posts (Atom)


