Showing posts with label printmaking. Show all posts

Tuesday, November 19, 2019

Printing on Bandanas

Craft stores have been stocking up on these bandanas in smashing colors. They are only a dollar and are perfect for using with kids. I bought a tube of white fabric paint and turned a sponge into an "ink pad". I picked up a potato masher at a dollar store, the doughnut shape is the end of a large mailing tube, and the lego is actually a box meant to be a party favor. Warning: the fabric paint is very difficult to scrub off of little fingers. The children can think about creating a pattern or they can just randomly print their designs. I covered our work table with a thick layer of newspaper since a surface that has a little give to it works best. If you don't have newspaper, you could use an old sheet.

Sunday, July 7, 2019

Printing on Tee Shirts

Styrofoam take-out containers are essentially unfriendly to the environment and I try to avoid them as much as possible. Recently I did bring home the pictured container from a restaurant with my uneaten portion of eggplant parmesan. When I noticed the design on the bottom I saw a printmaking opportunity. I cut out some lettering from the middle of the container leaving that small rectangular cut-out. I got out some oil based printing ink and a rubber brayer to print this child's tee shirt.
Since the ink is not water based, you will need some mineral spirits or turpentine to clean your brayer. I also plan on letting the Styrofoam printing plate dry so that I can use it again.

Tuesday, March 7, 2017

Craft with Old Dvds

Old CDs or DVDs are the perfect size and material to turn into a plate for monoprints with little kids. I added a bit of acrylic paint to tempera so that the consistency was a bit thicker. Using a sponge brush, I coated the CD and made lines in the paint with a Q-Tip. I turned the CD over onto the white paper and made the print. If one print was too faint or I didn't like it, I simply printed on top of it.

Tuesday, February 28, 2017

Block Printing with Teens

I generally post about art projects for young children, but I've having fun lately cutting out rubber stamps and I realized that they would be a fun project for teens. There are some simple directions here. The stamps are great to use for stationery or to print gift wrap.

Thursday, January 26, 2017

Make Stamps from Corks

Someone recently gave me a rather large bag of wine corks with the thought that I would use them in art projects. They have turned out to be rather handy to use for making stamps. I had a scrap piece of craft foam with the sticky peel-off backing. I cut some simple designs out and stuck them to the end of the cork. I added acrylic paint to damp sponges to use as my "ink pads".

Sunday, January 22, 2017

Print a Valentine

Valentine's Day will be here before we know it! An easy way to make a card is to cut out some bubble wrap in the shape of a heart. Use a brayer, foam roller or a brush to spread a layer of paint or printing ink onto the bubble wrap. Turn the bubble wrap over onto a white card and gently press the back. Voila! I used acrylic paint since I had it on hand, but a good quality tempera that is not too runny would also work.

Friday, December 9, 2016

Collograph Flower

I made these collograph prints with very young children. The one pictured is my example. They started with a piece of craft foam and scissors. I explained that they should try cutting out different shapes: some small, some slightly bigger, and to try and use some straight cuts and some curved or wiggley cuts. They didn't need to worry about it looking like an object that could be recognized. One little girl did opt to cut out a flower and a little boy did a house. We used white glue to attach the craft foam to a piece of corrugated cardboard and we let out printing plates dry until the next class.


For printing we just used tempera paint and little foam rollers that can usually be purchased in the home improvement section of the Dollar Store. I encouraged them to print many images on one sheet of paper.


I'm starting a newsletter with DIY templates, news from my Etsy shop, and step-by-step photos of some of the techniques for my artwork and illustrations. The newsletter in early June 2018 will include a template for a simple pop-up book to make with children. Sign-ups on the right-hand side of the blog.

Wednesday, October 14, 2015

Fall Leaf Prints

We printed leaves yesterday in my after-school art class. The children simply spread tempera paint with a sponge brush on the back of the leaf, flipped it over onto their paper, and printed. We had to be careful not to apply gobs of paint, but other than that, the children had a good time.

Saturday, September 5, 2015

Crayon Monoprints using a Warming Tray

I was poking around a thrift store in my town when I came across a warming tray. They were used back in the 60s to keep casseroles warm. I was pretty excited because I knew exactly what I was going to use it for.
Once the tray is warm I drew on it with crayons. Nice fat ones would work well, but I only had standard Crayolas. The crayons literally melt onto the surface of the tray. The ugly floral pattern on the tray is a little disconcerting. I lay a sheet of white paper on top of the tray and rubbed the back with a rag. You do have to watch out that you don't burn yourself, so do be careful. I would recommend this activity for children six and up who will pay attention to a warning about the heat. The tray wipes off easily with a rag. I printed multiple times on the same sheet of paper.
An added bonus to my thrift store visit was a box of 200 mats for two dollars! I almost passed them up since there are some weird colors, but they will be perfect for sending work home with the children this school year.

Friday, May 29, 2015

Making Stamps with Plasticine

I had seen posts on Pinterest where clay was used to form printing stamps. I had some plasticine at school that I find difficult to use with children since it is stiff to manipulate. Plasticine is a trademark name for an oil-based modeling clay that was developed by art teacher in England in 1897. I decided to use the plasticine to from stamps, but was a bit worried about the children's hands being covered in ink. I realized that I could press the plasticine onto a block of wood and it would adhere. The block of wood would keep their hands away from the ink. I gave the children different "tools" such as popsicle sticks and clothes pins that could leave impressions in the plasticine. When they made a print I encouraged them to stamp over and over again to watch the images become lighter. As they stamped, the indentations also would begin to disappear. This had two advantages. One, their stamp would be cleaned off so that another color could be used. Two, they were left with a clean slate to make new impressions. And, let's face it, they like pounding with the stamps.
The impatiens were made by me and turned into a card.

Tuesday, October 7, 2014
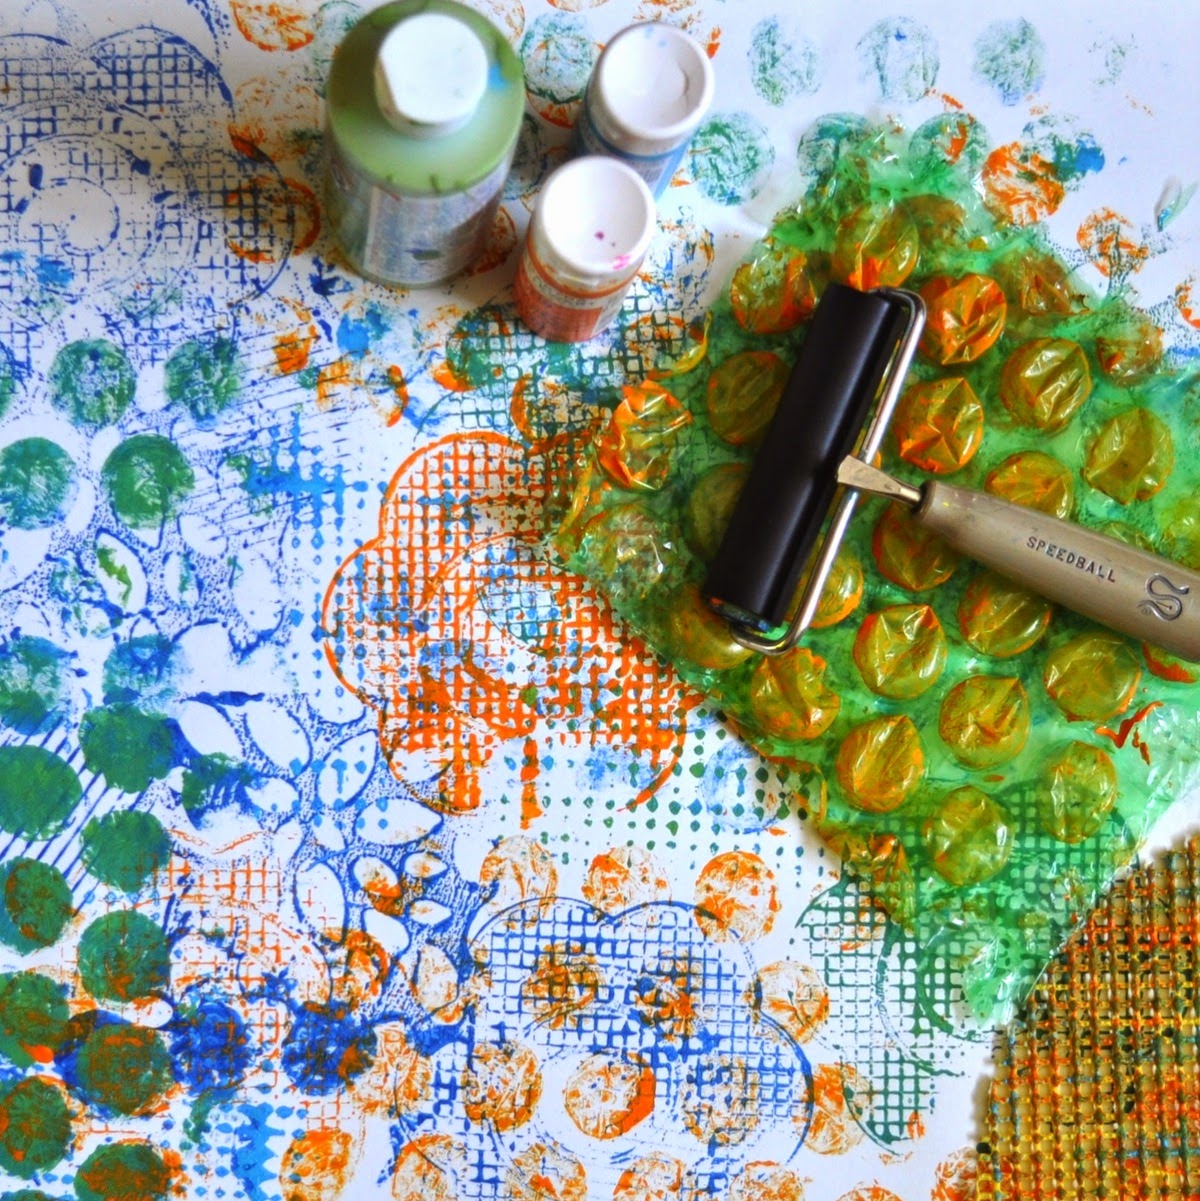
Printing Texture

Using a rubber brayer or a sponge roller (Dollar Store) to apply paint to textures and then printing them on paper is a great, open-ended activity. You'd probably be surprised at how many textures you can find by looking around the house. Yes, that's an unused fly swatter. I used acrylic paint, but printmaking ink or even thick tempera paint can work quite well. The results can be framed or used as gift wrap and there is plenty of room for experimentation and absolutely no room for "mistakes".

Thursday, July 10, 2014

Prints of Russian Nesting Dolls

The prints of nesting dolls were done by pre-schoolers and then assembled by me to auction at our school fundraiser. Each child was given the basic shape of the doll, cut from Styrofoam. They used a small wooden mallet to impress textures into the foam. Printing ink was applied to the "plate" nesting doll and the image was printed. Each child made two prints. On the first print, that they kept, they drew in a face of their own. On the one for the auction piece, I made the faces since some children at that age have trouble placing the features. I purchased a large stretched canvas (2.5 x 4') and painted it a navy-black background with acrylics. I adhered the prints with a white glue and top it off with some glitter Modpodge. The project tied in with their study of Russia. Feel free to ask questions in the comments or contact me.

Monday, April 7, 2014

Nature Gelatin Prints


Printmaking is a process of creating an image on one surface, called the plate, and transferring that image to paper or cloth. With gelatin prints the artist starts in the kitchen and makes a plate from gelatin and water. Gelatin is the stuff that gives gummy candies and marshmallows their chewy texture. It’s sold in little orange and white boxes at the supermarket and can be found in the aisle with the jello. Once the powdery gelatin has been mixed with water and chilled in the fridge (simple directions below) you will have a slightly rubbery surface that responds well to printing with textures that you can find outside.


Ingredients to Make a Gelatin Plate


6 tablespoons gelatin powder (6 packets, boxes generally have 4 packets per box)


1 1/2 cup cold water


1 1/2 cup hot water, almost boiling


9x12 inch shallow baking pan


Pour the cold water into the baking pan. Sprinkle gelatin into the pan. Mix until blended. Slowly add hot water while stirring continuously until all the gelatin has dissolved. Try to remove bubbles that may have collected on the surface by blotting with a paper towel. Place in the fridge for about 30 minutes or until the gelatin has set. You can remove the gelatin from the pan the same way that you would brownies. Just slice it into pieces and remove them with a spatula. Keep in mind that the size of your finished prints will be the same size as you slices of gelatin. You can begin printing immediately, or you can store your gelatin plates for up to ten days in the fridge.


Art Supplies for Printing


1. Drop cloth or newspapers to protect work surface


2. Water soluble printing ink or acrylic paint (available at most craft stores)


3. Large soft bristle brush, kitchen sponge or foam roller


4. A variety of natural objects such as leaves, shells, flowers, weeds, vegetables, fruit, feathers, bark.......


5. White drawing paper


6. A stack of newspaper torn into small sheets or scrap paper for blotting


For the best results, the natural objects that you collect should have interesting shapes and textures as well as being somewhat sturdy. A leaf, such as a maple, is a good choice since it has both an interesting shape and the prominent veins print nicely.


Directions


Squeeze some paint or ink onto gelatin plate and spread it out with your brush, sponge or brayer. If it looks too thick you can absorb the excess by laying a sheet of scrap paper on top and gently pressing. Press your nature objects into the paint. Pick up object. As long as you can see an impression in the ink, you will be able to make a print. Lay a sheet of white paper on top of gelatin plate and gently press with the palm of your hand. The gelatin plate can be cleaned between prints by pressing a sheet of scrap paper on the surface. Or you can wash it off in cold water in the sink. Make sure you dry it, too.


Have a stack of printing paper and scrap paper cut before you begin. A bit of trial and error is involved and it’s more fun to make many prints.

Friday, January 17, 2014

Stenciled Valentines

To make cards for Valentine's Day I started with a stencil that I cut out of wax paper.
Sheets of foam imprinted with patterns acted as stamps. I used a range of pinks, reds and orange ink pads.
I overlapped patterns to make the designs denser.
Very simple and fun printmaking project!

Thursday, August 29, 2013

Printing with Styrofoam Peanuts

I had to ship a package the other day and went up to the attic to poke around for a box. I hate to pay for shipping boxes. When I found one and opened it I was dismayed to discover that it was full of those pesky packing peanuts. As I was determining what to do with them I realized that they would make nifty little printing stamps, and I had just the perfect colors of ink on hand to give it a try. I printed them in orderly rows on a sheet of drawing paper. I think it would make a pretty fabric design as well!

Wednesday, June 12, 2013

Printing with Paper Doilies

This is a simple process of using doilies as stencils. I took a large sheet of white drawing paper and placed the doily on top of the paper. I cut up a kitchen sponge and used that to dab the acrylic paint directly onto the doilies so that the lace patterns would be captured. As you can see, I soaked through several doilies as I kept layering prints on top of one another. After it dried I cut my sheet of paper into rectangles and mounted the prints on notecards.

Thursday, June 6, 2013

Printmaking Collaboration with Children

Each rectangle of art was created by a different child at the school where I teach using a method of printing that uses a gelatin print. The children were all able to make several prints. I selected one from each child and mounted them on this canvas. We had an opening reception for the collaboration last night.

Thursday, April 18, 2013

Make Animal Print Stamps

To create a pattern that evokes the look of an animal print, try making your own stamps. These shapes were cut from craft foam and glued to scraps of wood to resemble the hide of a giraffe and that of a zebra. A sepia ink pad was used for the giraffe and a black ink pad for the zebra. Stamps can be used on cloth as well as paper and work well if you're making animal masks.


Saturday, April 13, 2013

Monoprints on Plexiglass

Monoprints are fun to make since they always yield some unexpected results. I used plexiglass for my printing plate, but a sheet of acetate or a piece of glass from a picture frame work just as well. Simply roll water-based printing ink onto the plexi with a brayer. I used the eraser end of a pencil to draw the marks directly into the ink. Then I pressed a sheet of paper on top of the drawing to make my print. With the remaining ink on the plate I made a fainter print. You can also layer prints on top of each other.

Saturday, February 9, 2013

Make a Drum

I retrieved empty tomato cans from our favorite local Italian restaurant (Hampton Junction. They make a great Margarita pizza) to make my drum. The sides of the can are painted with acrylic paints that have been applied with a sponge roller. I made my own printing stamps by cutting out shapes from some leftover packaging foam and then gluing the foam to blocks of wood. The stamps were used to decorate the sids of the drum and the top that I cut from very heavy paper. Poster board would surely work. I attached the top with bongo ties that my husband had on hand. They're similar to rubber bands, but they have that little embellishment that is pictured. I was pleasantly surprised that the acrylic paint adheres so well to the tin.
Green Crafts Showcase